Scenario: I want to have a work list item to be visible for all Users in an AD group, even if one of the user already opened the work list item. Also, I need to advance to the next step in workflow when one of the user in Group takes action.
I don’t want the worklist item to be disappeared from the User’s Worklist as soon as one user opens it. All users should be able to see the worklist item until one of the user takes action.
Resolution:
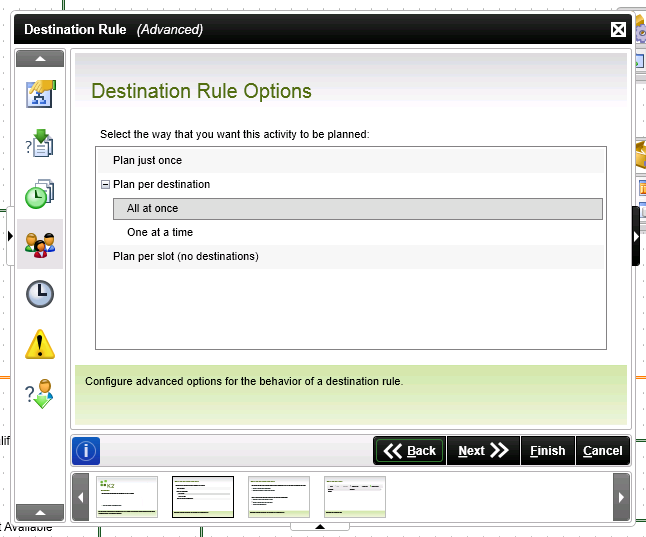
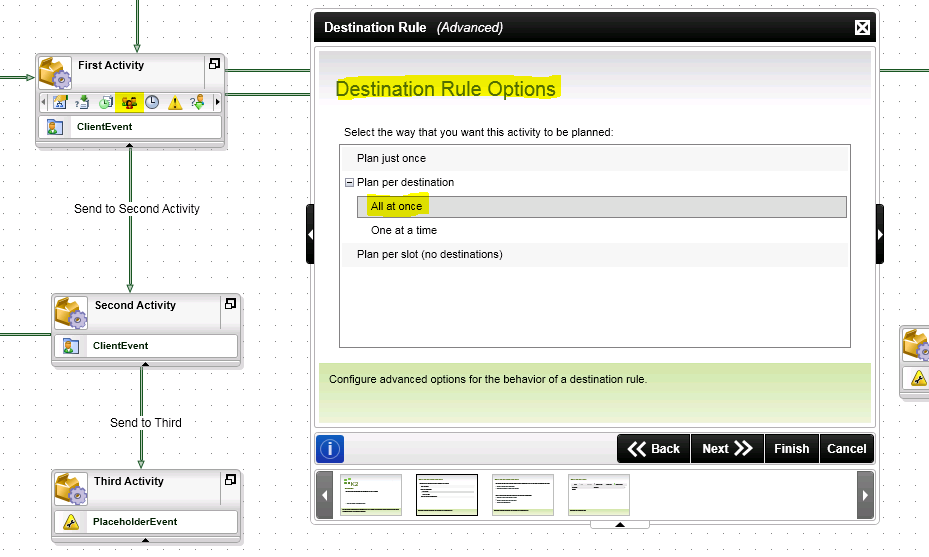
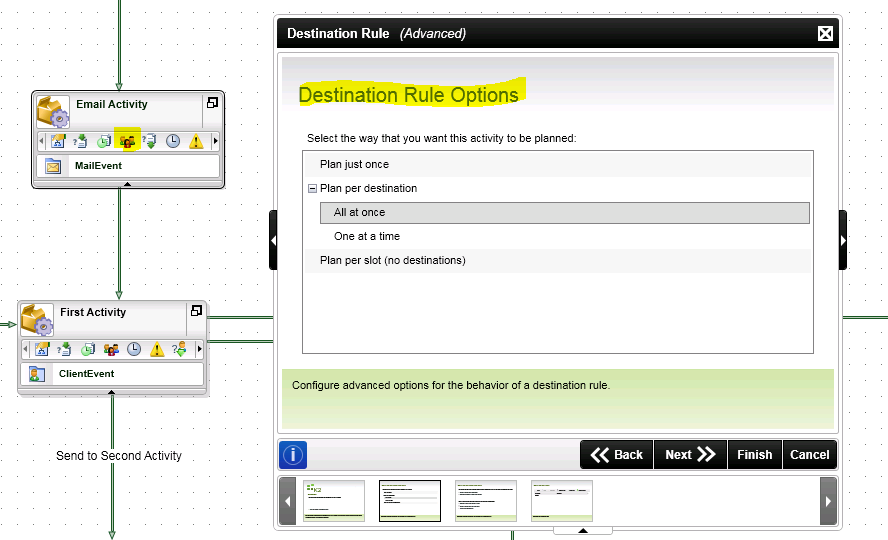
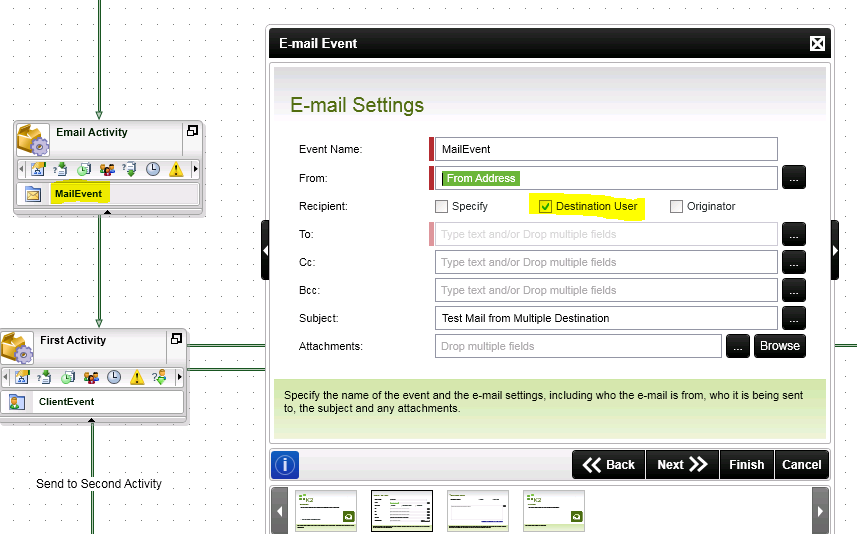
Go to Destination Rule Options of the Activity.
Select Plan per Destination – All at once
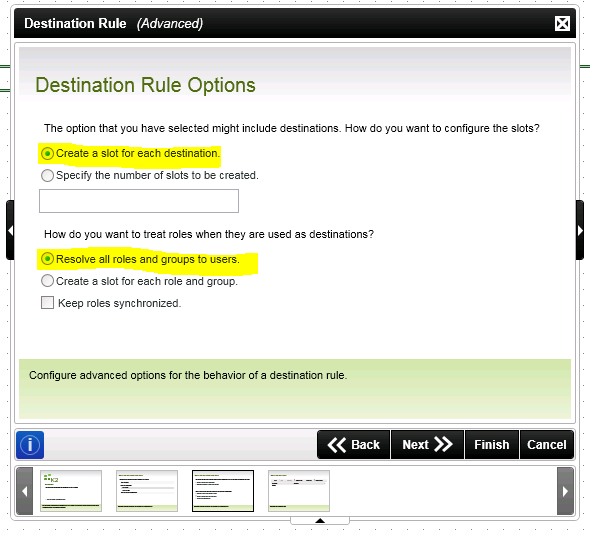
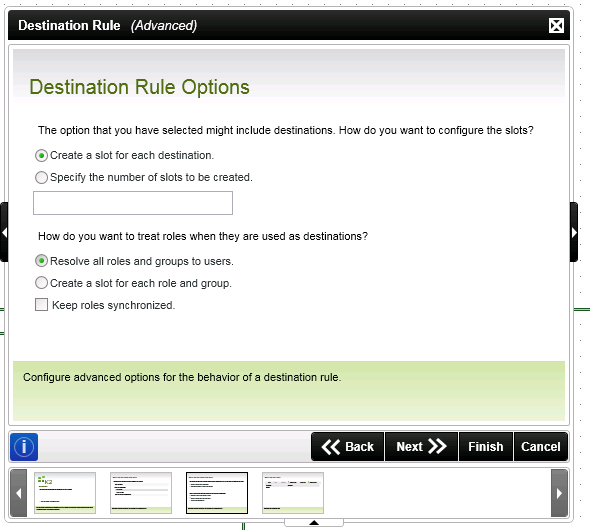
Create a slot for each destination.
Resolve all roles and groups to users since I want any user in the role or group can action the item.
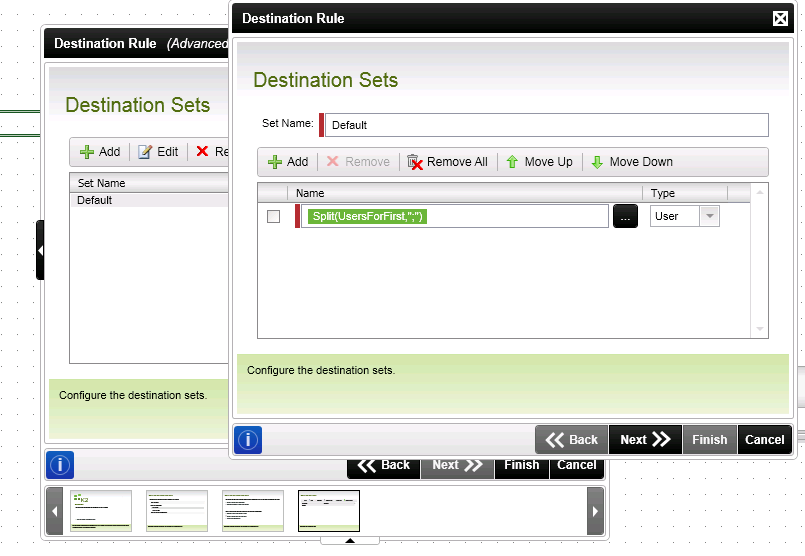
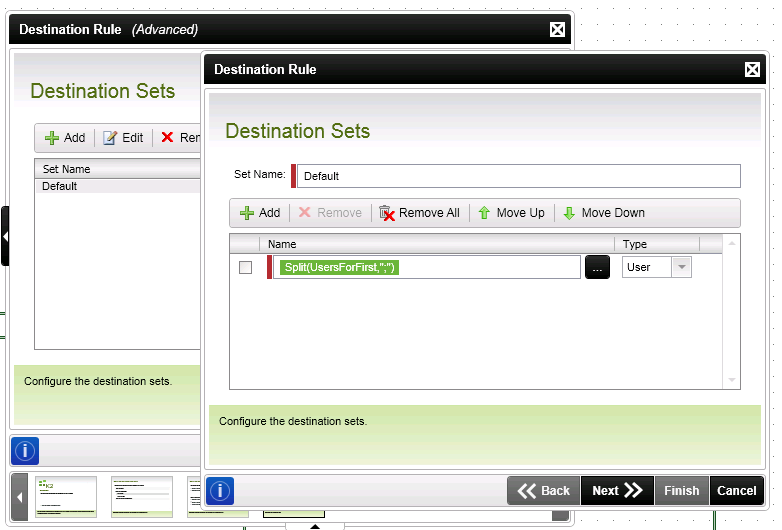
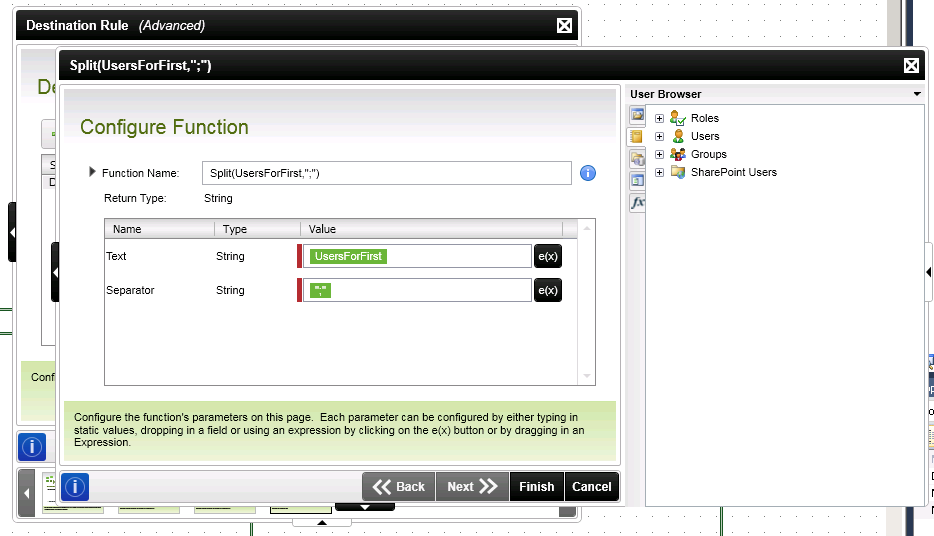
In the Destination Sets, Add the user/roles/groups who can action the item.
You can also add multiple users, Roles in the Destination Sets.
Right click on the kprx file of Visual Studio 2010 Designer for K2 stopped working.
Not able to go to Line properties in the workflow.
Solution:
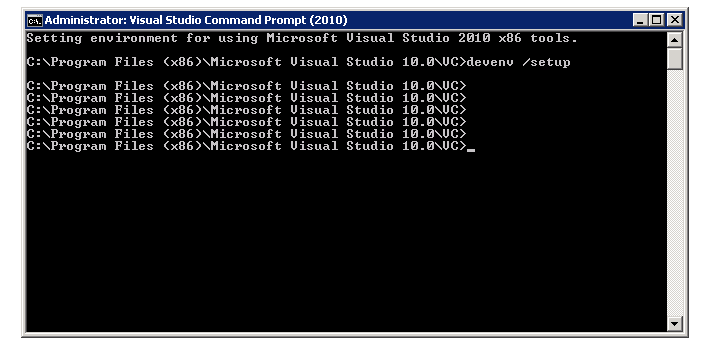
Go to Start => All Programs => Microsoft Visual
Studio 2010 =>Visual Studio Tools =>
Right click on “Visual Studio
Command Prompt (2010)” and Run as administrator.
Type “devenv /setup” and hit enter.
If still not working, try below solution:
1.Ensure Visual Studio
2010 is not running. Check for and shut-down the devenv.exe process
if necessary.
2.Using Windows Explorer,
browse to the folder with the originally extracted installation file e.g.: [your extraction folder]\Setup\Installation
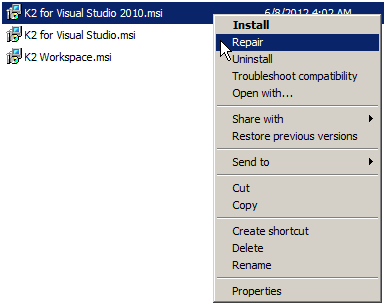
3.Right-click on the K2
for Visual Studio 2010.msi file and select Repair
The
K2 Designer extension will be repaired in a few seconds and the
mouse right-click context menu and K2 toolbar will be available in Visual
Studio 2010 once more.
Scope of the solution is Site Collection and not entire farm.
Deployed and managed by Site Collection Administrators.
Sandbox solutions are hosted on SharePoint User Code Server Worker Process(SPUCWorkerProcess.exe) where as Farm solutions are hosted on IISWorkerProcess(w3wp.exe)
Sandbox solutions are uploaded to Solution Gallery(_Catalogs/Solutions).
No need of IIS reset or IIS App Pool recyclying.
Used for Web Parts, Event Receivers, Feature Receivers, Custom SharePoint Designer Workflow Activities.
Sandbox solutions are stored in Content Database not in GAC.
When a site is restored, it gets Sandbox Solutions also, if any.
Assemblies in a sandbox solution are included in Solution package(.wsp) and package is deployed to Site Collection 's Solution Gallery.
When Sandbox solution is accessed(i.e when user navigates to a page that contains web part from Sandbox solution), any assemblies in the solution are extracted from Package in the gallery and copied to the file system(C:\ProgramFiles\Microsoft\SharePoint\UCCache) of the server that is handling the sandbox request.
For Sandbox solutions coding, referrence the
Microsoft.Sharepoint.dll from the path, ...\14\UserCode\Assemblies. For
Form solutions this dll can be referrenced from ...\14\ISAPI folder.
To
access resources outside a site collection from within Sandbox
solution, you must implement and call a Full Trust Sandbox Proxy.
Can only access same domain, other domains can't be accessed.
Can't be used for application pages, visual web parts, code-based workflows, unmanaged code, web service calls, SPUtility.Sendmail, RunWithElevatedPrevilages, Writing to Disk, Accessing objects in other site collection.
Sandbox solutions by default have code limits to 300 points.
Microsoft.Sharepoint.WebPartPages not allowed
Powershell Commands:
To upload Sandbox solution to Site Collection's Solution gallery,
An interesting thing to note about SPList.GetItems and SPQuery is that by default, SPList.GetItems will return you results in only one folder of a given list. If indeed you wanted to recurse the folders in a given list and identify all items matching the given criterion, you need to add the following line to your code:
Requirement: In a share point list, while adding a new item, a field value has to be validated depending on other field value in the list.
Solution:
A) Create a new aspx page for customizing newform.aspx.
Open Share point Designer and Open the site.
Go to the Share point list which you want to customize.(Lists => )
Select "NewForm.aspx" file and copy it.
Paste it under the same location where "NewForm.aspx" file exists and rename it to "Customized_NewForm.aspx".
B) Customizing newform.aspx.
Open the "Customized_NewForm.aspx" file in designer in design mode.
Select the "ListFormWebPart" and delete it.
From Insert menu, click on "Sharepoint Controls" and then click on "Custom List Form".
It will prompt you to select the List and content type. Select your list and Content type(Item). Also select "New Item Form" radio button for "Type of the form to create".Click on "OK" button.
It will insert your default new item page.You can do your customizations on this page such as removing some fields, hiding some fields, renaming the field text displayed etc.
C) Adding JavaScript code for customizing "OK" button click event.
Open the "Customized_NewForm.aspx" file in designer in Code/Split mode.
Go to the Content Place holder, "PlaceHolderMain" and insert the following lines of Javascript code and save the file.
script language="javascript" type="text/javascript"> _spBodyOnLoadFunctionNames.push("StartUpCustomScript"); function StartUpCustomScript() { ChangeOkButtonOnclickEvent("Input","SaveItem"); } function ChangeOkButtonOnclickEvent(tagName, identifier) { var len = identifier.length; var tags = document.getElementsByTagName(tagName); /*find all Input type controls on page (ie. control with tag )*/ for (var i=0; i < tempstring =" tags[i].name;" func =" tags[i].attributes[" onclick =" null;" approvaltype =" document.getElementById(" selectedapptype =" ApprovalType.options[ApprovalType.selectedIndex].value;" smapprovers =" document.getElementById(" selectedapptype ="="" value ="="">
C) Setting Customized New Form as default new item page
Open the list where "Customized_NewForm.aspx" file exists in Sharepoint designer and open the properties.(Right click the file and click on "Properties...").
From "List Properties" window, select "Supporting Files" Tab.
Select "Item" for "content type specific forms".
For "New item form", click on Browse and select the customized file i.e. "Customized_NewForm.aspx" and click on "Ok".
Now try to open the new form from list. Notice the url change to "Customized_NewForm.aspx" instead of "NewForm.aspx".
When I try to create a virtual directory for web service in IIS and try to browse the .asmx file, igot the following error "Unrecognized configuration section 'connectionStrings'". This is happening because by default the ASP.Net version selected is "1.1.4322" where as the code i have written is .Net version 2.0. So, the solution is change the Asp.net version. Go to the virtual directory, Properties. From ASP.NET tab, select "2.0.50727" for ASP.Net Version and click ok. Now it should work properly.